How to Upload Assets in P5js Web Editor
Tutorials / p5.js Tutorials / Images
Images
tutorial p5.js javascript image
- Adding Files to Your Sketch
- Loading Images
- Cartoon Images
- Resizing Images
- The p5.Color Course
- Getting Pixels
- Setting Pixels
- Preloading Images
- Other Image Functions
- Homework
Now you know how to utilize objects and create your ain classes. You know how to create an instance of a form, store it in a variable, and then call functions belonging to that example.
For example, you've seen the predefined p5.Vector class:
p5.js offers several other predefined classes. One of them is the p5.Paradigm course, which lets you load, display, and dispense image files.
Calculation Files to Your Sketch
Before you tin use an image file in your code, you accept to add together it to your sketch.
If you lot're using the p5.js web editor:
- Click the
>push merely under the play push button to expand the list of files in your sketch. Yous should seeindex.html,sketch.js, andway.css. - Click the dropdown carte du jour next to
Sketch Filesand then clickUpload file. - In the window that pops up, drag a file or click to select a file.
- When your file is done uploading, shut the file selector window.
You should now run across your image file in the listing of Sketch Files. You can collapse the list of sketch files by clicking the < button.
Loading Images
After you've added an image file to your sketch, you lot can phone call the loadImage() office to create an instance of the p5.Image form.
For example, if you have an image file named stanley.jpg, you tin create an instance of p5.Image similar this:
permit stanleyImage = loadImage ( "stanley.jpg" ); You tin as well reference an image on the internet using its URL:
let stanleyImage = loadImage ( "https://happycoding.io/images/stanley-1.jpg" ); Drawing Images
Now that y'all have an case of PImage stored in a variable, you tin brandish it by calling the image() function.
The image() office takes iii parameters: an instance of PImage and x and y coordinates that tell Processing where to draw the paradigm.

The image() function is merely similar the other cartoon functions you've already seen, similar the rect() and circumvolve() functions. Endeavour experimenting with different x and y parameters!

Note that these sketches declare the img variable at the top of the sketch, then initialize it inside the setup() part, then display information technology in the depict() office. You should follow this pattern with your images as well. If you load your prototype in the draw() function, you'd be reading the aforementioned file 60 times every second, which could slow your program downward or even cause it to crash.
Recall: declare your images at the meridian of the sketch, load them in setup(), and brandish them in draw().
Resizing Images
The p5.Image course contains several useful functions that permit you manipulate images. For case, the resize() function resizes an image. Here's an example that resizes the image whenever the user clicks the mouse:

This is useful if you lot're loading a big image and want to brandish it smaller.
Note that this only changes the size of the case, not the file itself.
The p5.Color Class
The side by side few sections use a class you might not have seen before: the p5.Color class!
The p5.Color class represents an R, G, B colour. Y'all can create a color using the color() function. Then when you have a color value, yous tin pass it into any part that also takes R, G, B arguments.
To convert from a p5.Color to individual R, G, and B, values, you can use the red(), green(), and blue() functions which have a p5.Color argument and render the corresponding R, K, or B value.
I personally avoid the p5.Colour class because I prefer working with separate R, Yard, and B values. Just the adjacent few functions only work with the p5.Color type!
Getting Pixels
After you load an image, you tin become the colour of an individual pixel by calling the get() part.
Here's an instance:
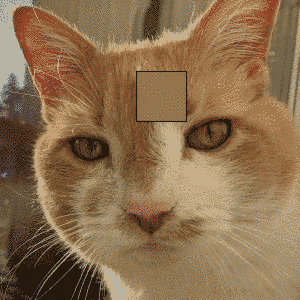
This program uses the get() function to get the color of the pixel that's nether the cursor's position, so displays a box showing that color. Think of it like a magnifying glass that shows y'all the pixel under the mouse.
Setting Pixels
But like you lot can get the color of a specific pixel using the get() function, you lot can also ready the color of a specific pixel using the loadPixels(), set(), and updatePixels() functions. Here's an example that turns a random pixel black every frame:

The loadPixels() function tells p5.js to prepare the image's pixels for changing, the set() role changes the colour of a specific pixel, and the updatePixels() role tells p5.js to update the image with its new pixels.
Preloading Images
Then far, the examples accept loaded the images from the setup() function. That will work as long as you lot don't need to use the paradigm correct away. Only you're going to have a problem if you do need to employ the image correct away, like if you demand to get its width and height, or if you need to modify the pixels in the setup() function.
The loadImage() function is asynchronous, which means that the rest of the code keeps running while the epitome loads behind the scenes. This helps your sketch load faster, considering it doesn't have to wait until all of the images are loaded to start running.
But if you endeavour to use the image right after you call loadImage(), but earlier the image is actually loaded, then information technology won't piece of work.
Hither's an instance:
You lot might wait this code to show an prototype and then draw circles on top of that image. But if y'all run it, you lot'll see that the prototype is not fatigued! That's because the image is non done loading when the code tries to draw information technology.
Y'all tin use the preload() function to set up this problem. The preload() function is chosen automatically, only earlier the setup() function. Any images loaded from inside the preload() office volition be loaded before the sketch starts running. This means you might see a "Loading..." bulletin when your sketch beginning starts, but it also means you can use your images right abroad.

This lawmaking might seem complicated, but try to read through it one line at a time.
This line loops over every row in the image:
for ( permit y = 0 ; y < img . elevation ; y ++ ) { For each row, this line loops over each column in that row:
for ( let 10 = 0 ; x < img . width ; x ++ ) { Given a row and a cavalcade (in other words, a y and an x), this line gets the color of that pixel:
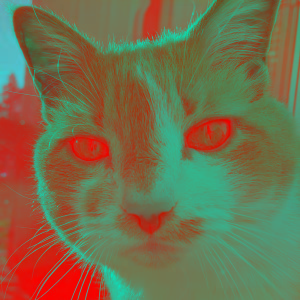
color originalColor = img . get ( 10 , y ); Now that you have the pixel'due south color, y'all can inverse that color by subtracting the R, Thou, and B components from 255:
const r = 255 - red ( originalColor ); const g = 255 - greenish ( originalColor ); const b = 255 - blue ( originalColor ); allow outputColor = color ( r , k , b ); If this part is disruptive, effort writing downwards some example colors and doing this math to run across how it creates the inverse!
Finally, this line sets the color of the pixel to the newly calculated color:
img . set ( x , y , outputColor ); Try modifying the logic to swap the bluish and green of each pixel, or to split up the red by two, or to rearrange the pixels.

Other Paradigm Functions
The p5.Image course contains several other useful functions. Bank check out the reference for more info nigh them. Don't exist agape to experiment!
Homework
- Accept a colored image and display it as black and white.
- Take a black and white image and display it in color. Don't worry too much near getting the colors correct!
- Show a character that walks around when yous press the arrow keys. Use dissimilar images for the different poses.
- Take an epitome and apply a custom filter to it.
- Resize an epitome to brandish in the
widthandheightof the window while maintaining its aspect ratio. Tall epitome should show a border on the left and right. Broad images should show a edge on the peak and lesser.
Comments and Questions
Happy Coding is a community of folks just like yous learning well-nigh coding.
Do you lot take a comment or question? Post information technology here!
Source: https://happycoding.io/tutorials/p5js/images
0 Response to "How to Upload Assets in P5js Web Editor"
Post a Comment